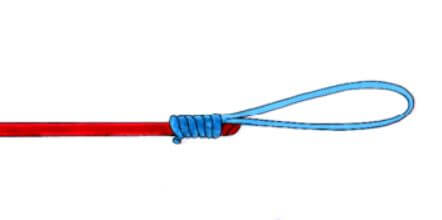
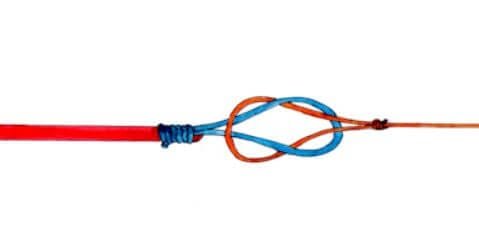
 When you are thinking about setting up the necessary equipment for fly fishing, you will be at the point where you have to tie a leader to fly line. You will have several options for tying a leader with a fly line, and you are likely to try out the method with a loop.
But, have you ever thought about what you could achieve by tying a leader to fly line without a loop? To help you attach the leader with fly line, we are here with this guide where we will be providing you with the step-by-step instructions on how to tie leader to fly line without loop.
Can We Tie Leader to Fly Line Without Loop?
 Usually, people tie a leader to fly line with a loop. But, in such cases, the leader and fly line are likely to move a lot while fly fishing. This results in the fish detecting the artificial nature of the fly and catching fish is very difficult. But, if you require a highly secure way of tying a leader to fly line, you will certainly need to use a method where a loop isn’t involved. This is the exact period where the use of a nail knot turns out to be beneficial.
With a nail knot, you can create a secure connection between your leader and fly line. This isn’t the only benefit of using a nail knot. You’ll no longer have to face the hinges and the secure connection won’t store any amount of water in it to generate spray. The use of a nail knot is also beneficial for the transfer of energy from the fly line to the leader while casting.
Did You Read: How To Choose Suitable Fly Lines?
How to Tie Leader to Fly Line Without Loop
Tying a leader to the fly line with a nail knot is one of the most used attachment methods in fly fishing. Since the knot utilizes a nail for the attachment, the name of the knot is known as the nail knot. But, you can also perform the nail knot with the use of an empty tube or a straw.
The nail knot allows you to create a secure connection between fly line and leader as well as multiple fly lines or backing. Here are all the steps involved in tying a leader to a fly line with the use of nail knot without a loop.
Step-by-Step Instructions
Step 1
The first thing that you need to do is to place a nail or a hollow tube at the end of the fly line.
Step 2
Now, you should create a distance of around 10 to 12 inches and place the heavier end of the leader against the fly line and nail/tube.
The distance needs to be maintained so that you will be able to perform the nail knot.
Step 3
The next thing that you need to do is to hold the uppermost heavier end of the leader (i.e. the butt section) and the fly line alongside the nail/tube with the help of your fingers.
Step 4
Then, you need to enclose the end of the leader surrounding the entire region of the leader, fly line and the nail/tube based on what you are using.
Step 5
When it is done, you have to create 6-8 wraps of around the length of the nail/tube from the left to the right across the fly line, nail/tube and the leader. The wraps need to be in a less distance between each other.
Step 6
The next thing you need to do is to pull off the tag end through the empty space created by the nail or across the empty tube.
Step 7
When you’ve pulled off the tag end, you can take out the material you used (nail, tube or straw) from the working area.
Step 8
With that being done, you should pull off the tag end again to create a secure connection between the coils.
Step 9
Now, you need to pull off the tag end again, but with a leader so that a nail knot can be created over the fly line.
Step 10
Finally, you are ready to clip the additional part of the tag end to complete the nail knot. It’s not mandatory, but doing so will reduce the issues that might appear during your fly fishing session.
With everything being done, you have just completed the entire steps to tie a leader to fly line without loop with the help of nail knot for a secure connection.
Tips for Tying Leader to Fly Line
Now that you have gone through all the instructions involved in the tying a leader with a fly line without a loop, you might want to start the process in real life. But, before getting started, here are some tips which might help you to tie a leader to fly line properly. Some tips mightn’t involve the nail knot since they can turn out to be handy for you in comparison to the nail knot in some cases.
- You might also want to perform braided loops, welded loops or line-to-leader links methods for tying a leader to a fly line rather than the nail knot method. However, these methods involve loops.
- If you aren’t friendly with the knot tying methods and aren’t likely to complete the knot, there are still different options available for you to make your entire task easy. You can find different equipment which are mainly built for knot tying purposes in the market.
- It isn’t always compulsory to use the nail or an empty tube (or straw) for knot tying purpose. If you have tied knots before and are experienced with it, you will be able to tie a leader to fly line easily without these equipment
- Pulling both sides of the fly line after creating the wraps might help in tightening the connection between leader and fly line.
Conclusion
Since we have completed our guide on how to tie leader to fly line without loop, you might have understood the major things involved in the connection of leader with fly line. Tying a leader to a fly line with loop might result in the unnecessary shaking of fly fishing equipments while casting, hence moving away from the fish. But, with the method to tie a leader with a fly line without a loop, you will be able to create a well-tightened connection which reduces the unnecessary movement. This is where this method is handy for you.
We believe you are now able to tie a leader to fly line without loop as per the instructions provided in our guide. If you are still in confusion, you can feel free to write down to us in the comments. We’d get back to you as soon as possible.
